
Last Updated on 24 September, 2026
Many new video editors struggle with clips that feel flat and static. Without motion and dynamic effects, even great content can appear dull and unprofessional. This is where keyframing becomes a game-changer, allowing you to control movement.
In this guide, you will discover why Filmora keyframe tools are essential for modern editing. By the end, you will have learned how to create smooth animations and eye-catching video effects.
Part 1. What is Keyframe Animation and How It Works?
Content creators use keyframing to create movement and visual changes to static elements over time. Instead of applying visual effects, you can control movement, color, and opacity with precision. When you set different values at specific points on the timeline, the tool automatically creates the missing frames. This process ensures continuous animation between your keyframes with little effort.
Tools like Wondershare Filmora make it easy for beginners to create smooth transitions and dynamic visuals. Understanding how animations progress makes it easier to learn how to add keyframes and create professional-looking videos.
Why Keyframe Animation is Essential in Video Editing?
To elevate your edits, understanding keyframe animation is important. Here are some key reasons why it plays a vital role in modern video editing:
- Enhances Visual Story Telling: Zoom in or fade out at the right moment to capture your viewer’s interest. This helps explain things clearly in tutorials, reviews, or educational videos.
- Precise & Creative Control: Editors can guide viewers’ attention to key details or actions. This precise control makes scenes more engaging and fun.
- Better Video Quality: Well-placed animations make videos appear polished and thoughtfully edited. This enhances production value and helps content stand out from others.
- Polished Transitions: It provides gradual transitions between effects and movements in the clip. This results in smoother, more professional-looking animations throughout the video.
- Adds Dynamic Effects to Static Images: Editors use keyframing to change motion into otherwise still elements. This transforms simple clips into engaging scenes that hold viewers’ attention longer.
Part 2. How Keyframe Animation Works: A Step-by-Step Guide
Before going further, it helps to understand the basic workflow for the animation and transitions. In the section below, we have provided a generic workflow so users can understand the basics of how to add keyframes to their videos:
Step 1. First, choose the element you want to animate and go to the timeline to set the first keyframe.
Step 2. Now, modify the settings, such as position, scale, and opacity, to create a new keyframe.
Step 3. Subsequently, the tool will automatically generate smooth motion between the keyframes.
Step 4. Finally, adjust spacing or add more keyframes to enhance flow and preview before saving the output on your device.
Part 3. Why Filmora Is Best For Smooth Keyframe Animation Effects
For beginners who are hesitant yet curious to add more dynamic effects to their videos, Wondershare Filmora is a good option. It is a user‑friendly video-editing software designed to make editing accessible for all. It has a clean layout, guided workflows, and easy tools that help you focus on creativity.
This tool detects and removes any silent parts of an audio. Furthermore, it automatically generates stylish captions and matches mouth movements to multiple languages. Even advanced options, like keyframing in Filmora, are presented in a way that feels approachable.
Key Features
- Multiple Parameter Settings: The tool allows users to create keyframes in three parameters, including audio, video, and others. You can change the pitch, fade in the audio, and generate a split-screen in the keyframes.
- Easy Keyframe Panel: Keyframe controls are built directly into the main video inspector. Clear buttons and visual markers help you see exactly where animations start and end.
- Keyframe Interpolation: Spatial interpolation controls the path, either straight, curved, or complex motion. Temporal interpolation controls how fast the motion or property change happens over time.
- Presets and Effects: Combines manual keyframing with ready‑made effects and templates to enhance videos. This option gives content creators both speed and flexibility as they experiment.
Easy Guide to Adding Keyframes With Filmora
Now, after discussing the key features of the tool, let us follow the guide below to understand how keyframing works in Filmora:
Step 1. Import New Video to Start a Project
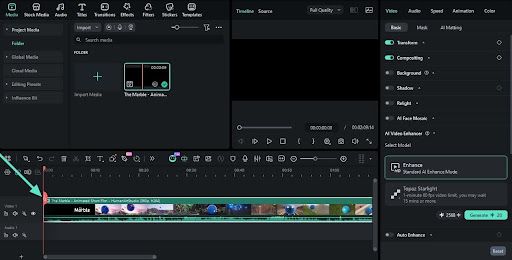
To start, launch the application on your PC, then click “New Project” to create a brand-new creative project. Once you have imported your video, drag it onto the timeline to start editing.
Step 2. Open the Transform Section
Secondly, click on the clip on the timeline and navigate to the “Video” tab. Under the “Basic” tab, click on the “Transform” option, and you can select from various keyframing options such as “Position,” “Scale,” “Rotate,” etc.
Step 3. Set Up Your First Keyframe
Here, select the point on the timeline where you want your first keyframe to be. Then press the “Add Keyframe” icon, select your option, such as “Position”, and change the values to your preference.
Step 4. Adjust All Keyframes in the Video
After repeating the previous step for all keyframes, you can adjust the keyframe icons on the timeline. By moving the keyframe icons left and right, you can slow down or quicken the motions.
Step 5. Export The Final Video to Device
Finally, navigate to the “Export” button in the upper-right-hand corner of the interface. From the drop-down menu, select “Export to Device” and select a folder to place the output.
Conclusion
In the end, this article provided a comprehensive guide for beginners on how to effectively use keyframing in their videos. We covered how keyframe animation controls movement, zoom, rotation, and fades to make videos dynamic. For an even smoother editing experience, pairing Filmora keyframe tools with Filmora.TV—its web canvas platform for visual prompt mapping and storyboard planning—delivers a complete workspace from concept generation to fine-tuned motion design.

Leave a Reply