
Last Updated on 30 June, 2025
Want to unlock all glyph pages in Chants of Sennaar without leaving a single Journal entry blank? This 2025 guide shows you exactly where to find every symbol in each of the five Tomes, how to trigger every page prompt, and which puzzle tactics and shortcuts pro runners use. With patch-specific insights, developer callouts, and community-tested tricks, you’ll achieve guaranteed 100% completion every playthrough.
 Unlock all Glyph Pages in Chants of Sennaar
Table of Contents
- How Glyphs & Journal Pages Work
- Tome I – Devotees (Abbey)
- Tome II – Warriors (Fortress)
- Tome III – Bards (Garden)
- Tome IV – Alchemists (Laboratory)
- Tome V – Anchorites (Exile)
- Journal Page Unlock Tips
- Terminal & Link Puzzle Notes
- Commonly Missed Glyphs & Solutions
- Collection Best Practices
- Summary & Next Steps
How Glyphs & Journal Pages Work
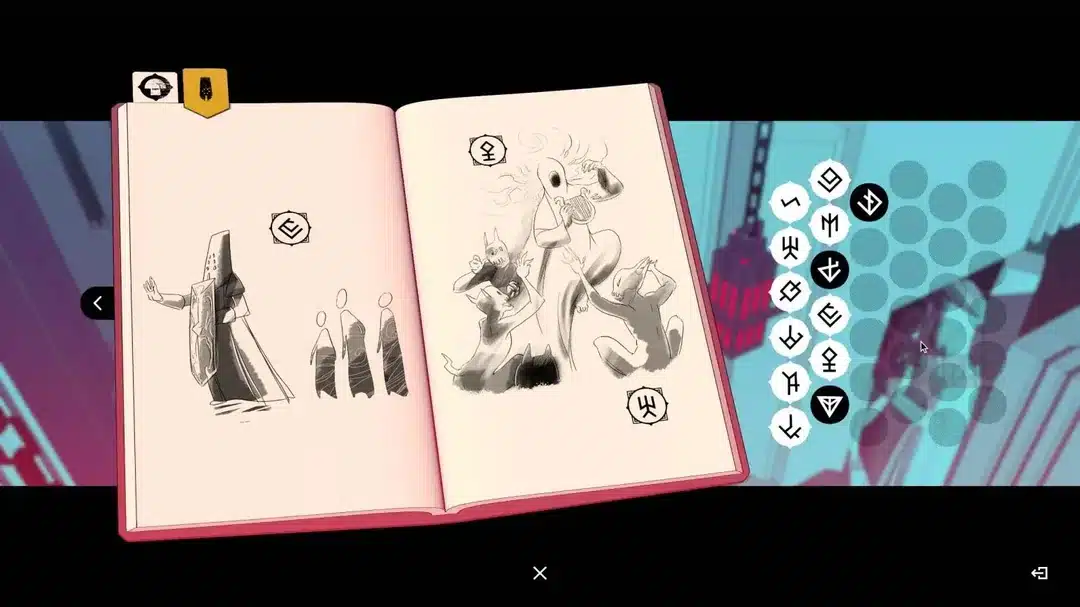
Every mural, signpost, and inscription you examine adds a unique glyph to your in-game Journal. Once you’ve collected all symbols for a page, the game pauses and asks you to match each icon to its illustration, correct matches lock in the page and often open a related terminal or secret passage.
Tome I – Devotees (Abbey)
Glyph list: Abbey, Cemetery, Church, Close, Death/Dead, Devotee, Door, Find, Free, Garden, Go/Pass, God, Greetings, Help, Instrument, Key, Lens, Love/Like, Make/Create, Man/Human, Me, Music, Not, Open, Plant, Pot, Potion, Preacher, See/Look, Seek/Want, Talk, Up, Warrior, You.
- Church nave murals (zoom every pillar panel)
- Gardener’s bench inscription by cloister entrance
- Pottery stall shelves (inspect clay pots closely)
Tome II – Warriors (Fortress)
Glyph list: Balance, Bellman, Big/Small, Bottle, Call, Carry/Possess, Chosen, Crate, Death, Duty, Fear, Fortress, Go/Pass, Help, Impure, Key, Lay, Love/Like, Make/Create, Music, Not, Protect, Plural, Push, Scientist, Seek/Want, Sun, Treasure, Trolley, Vessel, Wait, Warrior, Weapon.
- Rotating statue base in the Great Hall (rotate four clicks for Protect & Chosen)
- Faces of armory crates in storage annex
- Guard barracks murals near the duty roster
Tome III – Bards (Garden)
Glyph list: Agora, Ascend, Bard, Beauty, Be, Book, Brother, Comedy, Compass, East, Fire, Free, Go/Pass, Greetings, Hammer, Idiot, Instrument, Love/Like, Man/Human, Me, Monster, Music, North, Path, Play, Pliers, Plural, Question Mark (¿), Carry/Possess, Fortress, Saw, Seek/Want, South, Theatre, West, Windmill, Weapon, You.
- Entrance signpost (inspect both sides)
- Musician’s arbor plaque at central pavilion
- Tiled mural next to the fountain after solving the water puzzle
Tome IV – Alchemists (Laboratory)
Glyph list: 0–9, Alchemist, Bard, Book, Brother, Carbon, Close, Copper, Death/Dead, Door, Fairy, Formula, Gold, Help, Laboratory, Library, Make/Create, Me, Mine, Monster, Not, Open, Plant, Plural, Refectory, Silver, Transform/Transformation, Warrior, You.
- Lab 2 calculator display (press any number to flash digit glyphs)
- Chemical formula posters in Labs 1 & 3 (zoom highlighted equations)
- Metal-press mural near workshop entrance
Tome V – Anchorites (Exile)
Glyph list: Climb, Come, Dead, Die, Disregard, Door, Doors, Exile, Fear, Go/Pass, Greetings, Help, Key, Make/Create, Man/Human, Me, My People, Not, Open, People/Peoples, Plural, Revive, Seek/Want, Stop, Stranger, Talk, Tower, Up, Us/We, Wait, You.
- Word-building console (complete first sequence to unlock initial symbols)
- Cavern murals behind the statue room (rotate torches for extra visibility)
- Translator-machine terminals in the exiled wing
Journal Page Unlock Tips
- Ring Indicator Dot: A white dot on any glyph ring means you haven’t yet seen that symbol nearby.
- Hint Button: Highlights clusters of undiscovered glyphs without spoiling exact designs, use sparingly.
- Save & Reload: Save in Slot 2 before entering each new zone; if a page fails to trigger, reload and sweep every interactable in 360°.
Terminal & Link Puzzle Notes
After each Tome, special terminals let you rebuild glyph networks that reshape the Tower’s structure. Always reference your confirmed glyph meanings, any mismatched link resets the puzzle. Completed terminals unlock elevator shortcuts, hidden ledges, and the true-ending path.
Commonly Missed Glyphs & Solutions
- Abbey: “Lens” & “Pot” at the pottery stall; “Preacher” & “Plant” behind the altar mural.
- Fortress: Use torch puzzle in Antichamber for Key/Instrument/Balance/Vessel; Telescope Room panels for Sun/Moon/Bellman; “Impure” & “Scientist” under staircase slab.
- Garden: “Compass,” “North,” “West,” & “¿” only after cistern puzzle, inspect east sewer mural.
- Laboratory: Explore Silver Mine side-room (Warrior/Not/Plant); Fairy & Refectory on potion crates & refectory mural; digits 6–9 via Lab 3 switch.
- Exile: “Revive” after console link-2; “Disregard” on side panels post-sequence.
Collection Best Practices
- Live Note-Taking: Sketch provisional glyph meanings in a physical notebook for quick reference.
- Context Clues: Environmental props almost always mirror Journal illustrations, zoom on pots, crates, lenses.
- External resources:
- Video Reference: Watch Trophy Tom’s 100% glyph walkthrough on YouTube for live mapping and link solving.
Summary & Next Steps
Deciphering every glyph in Chants of Sennaar unlocks rich lore, secret passages, and all story endings. Armed with accurate Tome lists, focused Pro Tips, developer-verified Notes, and community insights, you’re guaranteed complete Journal mastery. Next up: our deep dive into terminal-puzzle optimizations and speed-run-style timing shortcuts.

Leave a Reply